Google Slides has emerged as an incredible and easy-to-use cloud alternative to the traditional Microsoft PowerPoint in the world of presentations. Google Slides offers both simplicity and optimal functionality. One such powerful tool that one can add to their presentations is incorporating audio. A background score, narration, sound effects, and any form of audio incorporation enhance the overall effect of the presentation making it more engaging and interactive and conveying your message strongly to the audience. Now the question is, how can one add interactive audio to their Google Slides and what is the simplest way to do that? We have got you covered in that, In this tutorial, we will learn how to add audio to Google Slides in just 4 simple ways that can make your presentation a masterpiece.
Table of Contents
Method 1: Add audio to Google Slides via Google Drive
Here is a step-by-step guide on how to add audio to any Google Slide via Google Drive.
Step 1: Get your audio file ready
The first and basic step is to get your audio file or music ready for the further steps. You can create your audio file via recordings or you can download any other compatible format ( MP3 or WAV ) audio Clips or tracks From Certain sites like Pixabay, free music archive, or YouTube Audio Library.
Step 2: Upload your audio file on Google Drive

The second step is to upload your audio clip or file on Google Drive at
https://www.google.com/drive/download/. You need to click on the”new” button as shown in the above Image (the“+” Icon) on the top left corner of Google Drive and click on the “File Upload” option over there. Locate and select the audio clip on your device you have sound earlier. click on “Open” to upload the file on the drive. Make sure the file is in MP3 or WAV Format.
Tip: Make sure that you change the access settings to “access to anyone with the link” by clicking on the share icon.
Step 3: Open your slide and insert the audio from Drive
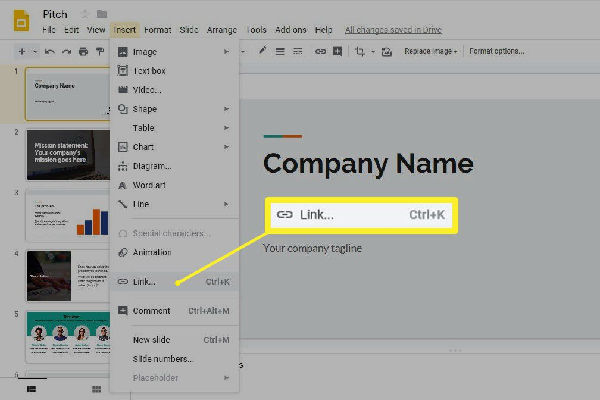
Go to your Google slide ppt and select the particular slide in which you want to add the audio clip. From the top menu bar select the “Insert” tab and choose the “Audio” option from the dropdown menu. You will see two options in front of you: “By Upload” & “By URL” As you have saved the audio file in the drive choose the “Drive” option.
Step 4: Choose and Insert the Audio file
Once you select the “Drive” option, you will be able to see a list of Drive files in front of you. Find the audio clip you uploaded on the drive using the search bar or by its name and click on the audio file to select it. Click on “Select” or “Insert” in the bottom left and your file will be added to your selected slide.
You can click on the speaker icon on the slide that represents the audio on the slide. You can customize playback with the help of that icon as per your choice.
Method 2: Insert audio to Google Slides from a URL
If you do not want to save your audio in your drive, you can also directly insert audio that is hosted online into your Google Slides with the help of a URL to add music to Google Slides. You can add background effects, and copyright-free audio with this method.
Step 1: Find the URL online and take care of the Copyright
Search for an online audio source that offers audio files that are free from Copyright issues or offers royalty-free sound effects or music. Most such sources will also offer you an option to share the audio clip on other platforms through a URL. You can get a shareable URL for those audio clips that you can copy directly.
Tip: You can do a Google search with the keyword “Copyright and Royalty free music and audios for Presentations” to get such free audio online websites and sources.
Step 2: Insert the Audio in the Google Slide via URL
Open the slide and go to that particular slide where you wish to add the audio. Select the “Insert” Tab from the Menu bar on the top. Choose the “Audio” option from the drop-down menu.
Step 3: Embed the Audio in the Slide using the URL
You will see two options in front of you once you click on “Audio”. One will be “By Upload” and the other one will be “By URL”. Select the “By URL” option.
Step 4: Paste and URL and Insert the Audio in the Slide
Under “Audio” You see a field where you can paste the Complete URL of the audio file that you got in the first step. Paste the Complete URL in that field and once done click the “Insert Media” button on the bottom to add the audio clip on your selected slide and the audio will be embedded successfully.
Once again, you will be able to see a speaker icon on your slide. You can customize and move the icon and the audio file as per your choice and requirements.
Method 3: Using Youtube link
Now we will look at the steps that you need to do if you wish to add any audio from a YouTube video to your Google Slide Presentation. You can add a famous song, a clip from a video, or a TED talk to your presentation by following the steps –
Step 1: Get on YouTube and Search for the Video you want to add to your Slide.
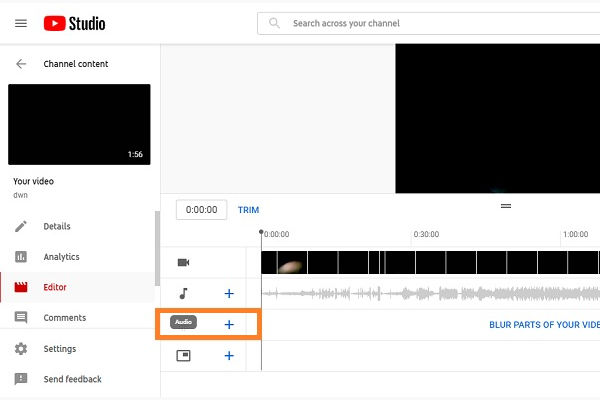
Open on the YouTube application or access it through the link youtube. Search for the video that has the audio you wish to add to your Google Slide.
Step 2: Get the URL of the Video from YouTube
Once you find the video on YouTube, play it and look at the address bar of your browser for the complete URL of that video. If you are on the YouTube application, simply click on the “Share” option and click on “Copy link”.
Step 3: Go to your Slide and Insert the Audio there
Once you have copied the URL, move to your Google slide presentation and select the slide in which you wish to insert the Audio. Select the “Insert” Tab from the Menu bar on the top. Choose the “Audio” option from the drop-down menu. You will see two options: “ By Upload” and “Search YouTube” Select the “Search YouTube” option.
Step 4: Paste the video URL and Insert the Audio
Search for the field option that reads “ Search YouTube” or “Enter a video URL”. Choose the “Enter a video URL” and paste the complete video link there. Make sure to recheck the complete link once. Now, click on the “Select” option to add the audio on the selected slide directly.
Once you can see the speaker icon on the slide, it means that the audio has been successfully embedded on the slide.
Note: This method includes the audio of the YouTube video on the slide and not the entire video itself.
Also read: How to Make a Video with Pictures/Photos (3 Ways in 2024)
Method 4: How to add narration to Google Slides
If you wish to add a more personalized and engaging experience on your Google Slide. You can add & record your voice or narration directly on the Google Slide. Let’s look at the steps on how you can do that.
Step 1: Make Sure you Rehearse and Prepare the Narration in Advance
Before adding or recording any Narration, it is highly advised that you prepare a script and rehearse the entire narration multiple times to avoid any mistakes and get a great flow throughout the narration.
Step 2: Search for the Recorder on the Slide
On your Google Slide presentation go to the particular slide where you wish to add the narration. On the selected slide, click on the “Slide show” tab on the top menu bar. Now select the “Record Slideshow” option from the drop-down menu.
Step 3: Record your Narration by Hitting the Record Button
You will see a recording toolbar at the bottom of the screen. Now you need to click on the button (Circular red) that reads “Record” to start the recording of your narration. Click on “Stop” ( The black square) once you are done with the narration.
Step 4: Just Save the Recording to Embed the Audio.
Once you click on “Stop”, you will see a window pop up on the screen with options like “Discard” or “Save Recording”. Once you are sure about the recording, simply click on the “Save Recording” option and audio narration will be added to that particular slide on your Google Slide presentation. Once you see the speaker icon, you can move the icon or customize it as per your requirements. This way you now know how to add music to Google Slides.
How to add audio to Google Slides from an Android or iPhone?
Apart from adding audio to your Google Slides via Google Drive, URL, YouTube, or your own narration, you can also add audio file from an Android or Apple phone. Below is a step-by-step guide on how to do it.
Step 1: Recording your Audio
The first step is to capture your desired audio that you want to include in your Google Slides. You can do this with the help of a high-quality recording app. Once you have recorded it, you can make the necessary edits and save the track on your device.
Step 2: Uploading the Track
The second step is to upload the recorded track. To do this, access Google Drive, press on the +New option and upload the recorded track.
Step 3: Providing Share Permissions
Step three is to provide the required permissions. This can be done by clicking on the uploaded audio file and navigating to the sharing permissions. Make sure to select the option Available to anyone with the link.
Step 4: Inserting the Audio
Step four is to insert the audio, open the presentation on your device and choose the slide where you want to insert the audio track. To do this, click on the Insert option and select the Audio option from the drop-down menu. Choose your desired audio track and click on upload.
Step 5: Making the Required Adjustments
Finally, you can make the necessary adjustments. For example, you can move the audio icon wherever you want it to appear on your Google Slides or if you wish to adjust the audio settings, you can access the format option and then the playback menu.
FAQ’s
Is there any copyright infringement issue if I add music to my Google Slide Presentation?
The copyright infringement issue depends upon the type of music/audio you are using on your Google Slide Presentation. In case, you are using any music or audio that has CopyRight over it and you have not taken any prior permission to use that audio, you might face a CopyRight strike. However, if you are using any audio or music you have selected or downloaded from any common license or royalty-free music source, you will not face copyright issues.
Can I control the audio settings or when the music plays after adding the audio on the slide?
Yes, you can customize the audio file even after you have embedded it on the slide. You just need to click on the Speaker icon and it will give you multiple customization options like fade, autoplay, volume adjustment, and loop. Simply right-click on the Speaker icon, and select the option “Audio Options”.
Can I add music from streaming platforms like Spotify and Apple Music directly to my Google Slide?
You cannot directly add any audio or music from any streaming platform like Spotify or Apple Music to your Google Slide presentation due to copyright issues and no direct support option. However, there is a trick by which you can do that. You need to download the music clip on your device and then add it to your Google Drive and then follow the steps mentioned in this guide to add the audio from Google Drive to your Google Slide presentation.