
With rapid advancements in the OS, new versions are launched in frequent successions. Windows 10 is the most popular operating system used in modern devices due to its stability and performance. According to a report published in 2019, over 900 million devices were running Windows 10. It is growing increasingly popular due to several customizable options in terms of software, display, and many more. However, there are certain options that cannot be customized using the front-end of Windows 10 such as pre-boot options, hardware configuration, and boot order of the drives.
BIOS is a firmware that is used to access these crucial-to-function options in any computer system. Whenever a PC is switched on, BIOS is the first thing that loads on the OS. It is essential for the proper functioning of all system processes. It also makes the operating system more personalized and intuitive.
To understand and utilize the full potential of BIOS, we need to know about its functions and operation. In this article, we will discuss everything you need to know about BIOS. We will also provide a step-by-step guide to access BIOS in Windows 10 for ease of operation.
Table of Contents
What is BIOS?
BIOS stands for Basic Input/Output System. It is programmed on an erasable, programmable, read-only memory chip or EPROM. It is a piece of integrated machinery that is directly connected to the motherboard of the computer. BIOS functions as storage that retains data from the last Windows operation and retrieves it when the PC is switched back on. Therefore, it controls all the programs running in an OS.
BIOS also manages the data flow between the computer’s operating system and its attached devices such as the keyboard, mouse, or printer. So, each time you switch on your PC, BIOS runs a Power-On Self Test or POST that identifies all the devices connected to the system and ensures their proper functioning. If any error is encountered, it immediately displays a message. All these processes are completed in just a few seconds.
Basic functions of BIOS
BIOS is majorly responsible for loading the operating system whenever a PC is switched on. It is vital for most modern computers as it performs the following functions to ensure optimal functioning of all the components in an OS.

Power-On Self Test (POST)
BIOS performs Power-On Self Test or POST as the first thing after the computer is switched on. While running POST, BIOS ensures that all the computer hardware and its connected devices are functioning properly. In case of any error, BIOS immediately sends out an alert in the form of an error message displayed on the screen. Alternatively, the system may emit repeated beeps to imply malfunction.
System startup
After POST analysis, BIOS runs bootstrap loader. It is a program designed to locate an operating system within the hard drives boot sector. The bootstrap loader loads the OS into the memory. The system boots normally if everything is functioning properly.
Drive and hardware functioning
BIOS is a part of ROM that is attached to the computer’s motherboard. Even after the system is switched on, running BIOS continues to work in the background. It retrieves the location of drives and executes it in the right socket of the system. This enables automated access to all the files stored in the system without making the user locate each of them manually.
Temporary data storage
CMOS or Complementary Metal Oxide Semiconductor is a chip-based technology that retains information of all the programs after the system is shut down. BIOS controls the CMOS functioning and retrieves information from it to recover data in case of power failure. Therefore, it prevents any data loss in the case of an abrupt system shutdown.
Apart from the major functions mentioned above, BIOS setup can also be used to:
- Change the boot order of devices connected to the system.
- Set and change the date, time, and password of the system.
- Change the function of the Fn keys. Other keyboard shortcuts and customized functions can be modified using software like Quickeys.
- Modify CPU settings and system voltage that will aid fast processing time.
- Change memory setting and enable/disable CPU cache.
- Set and change passwords for BIOS to avoid unauthorized access. However, you must remember the password at all times because a complete format might be required to reset it. It can be a time-consuming process and might even lead to data loss.
BIOS vs UEFI
Unified Extensible Firmware Interface or UEFI is the latest version of BIOS. The first open-source UEFI was implemented in 2004 by Intel and its latest version 2.9 has been published in March 2021. The basic difference between BIOS and UEFI is that UEFI stores all the information in a “. efi” file format instead of storing it on the firmware.
UEFI is expected to replace BIOS altogether in the coming years as it serves the following advantages:
- Faster boot time.
- Extended drive size up to 9 zettabytes unlike BIOS that only supports up to 2.2 terabytes.
- Discrete driver support. This helps easy installation of updates.
- Enables operation in 32-bit and 64-bit mode enabling GUI or navigation with mouse option.
- Increased security because it prevents booting from unauthorized applications. This may not be preferred in the case of dual-booting operations.
How to access BIOS in Windows 10?
Default BIOS settings work fine for any OS in a PC’s lifetime. However, one might need to access BIOS for business or security reasons. BIOS cannot be accessed from within the Windows. It takes a specific set of keystrokes to enter BIOS.
In older devices, it was comparatively easy to access BIOS by simply pressing F1 or F2 while turning on the computer as they boot slowly. However, in newer devices with fast processors, there usually isn’t time to hit the button in time.
Following are the easy steps that can be followed to access BIOS in Windows 10:
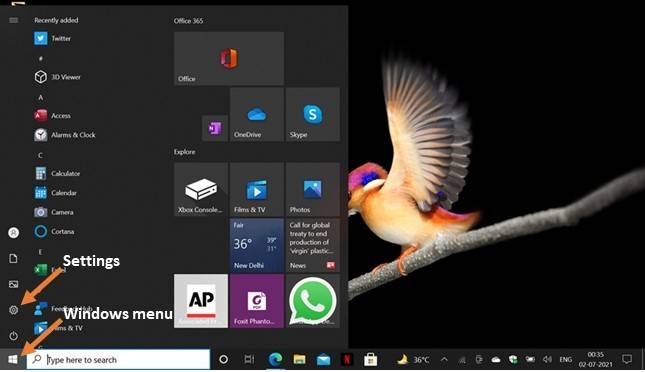
Go to Settings
You can find the “Settings” option in Windows start menu located at the bottom left corner of your screen. Navigate to the Windows menu and click on settings.
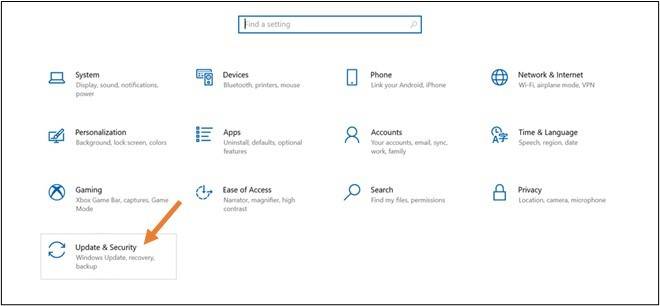
Click on “Update & Security”
Once you click on “Settings”, a new page will open. Find the option of “Update & Security” in the bottom left corner and click on it.
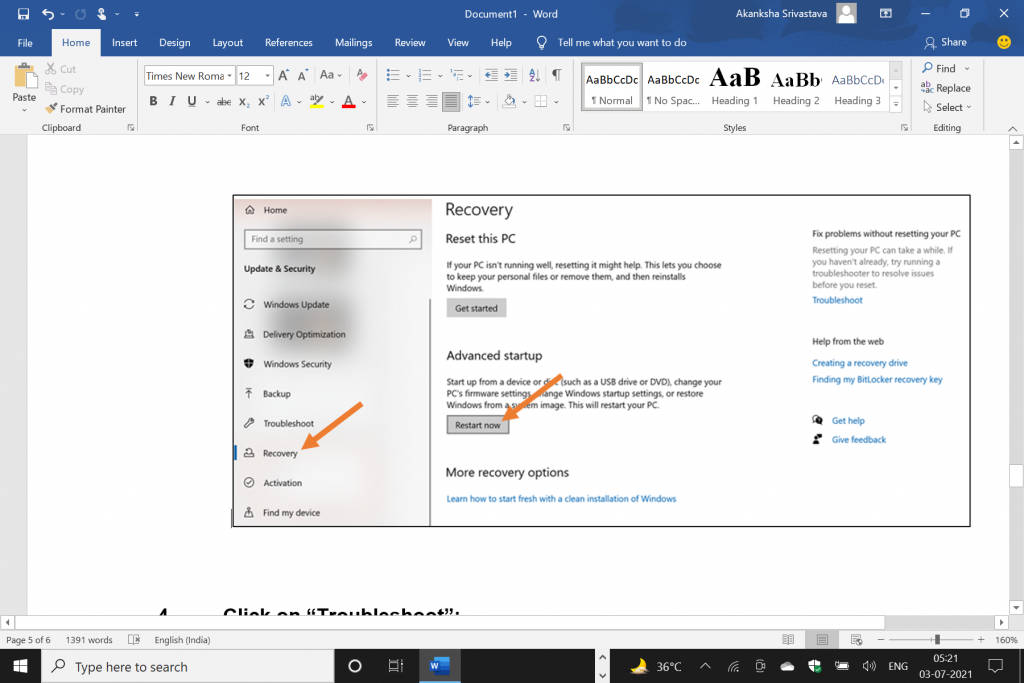
Select the “Recovery” tab and then click on “Restart now”
Once you click on “Update & Security”, you will be taken to a new window where you can find the “Recovery” tab on the sidebar menu. Click on it to see the option on the right side and then click on “Restart Now”. This will immediately restart your computer.
Make sure that you save and close any important documents opened in other programs before restarting your computer to avoid data loss.
Click on “Troubleshoot”
Once your computer restarts, a new screen will appear. This will be different from your normal login page. Find and click on “Troubleshoot” and then on “Advanced Options” in the new window that appears.
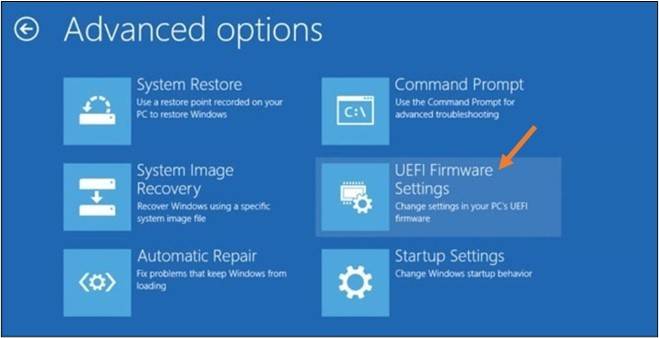
Go to “UEFI Firmware Settings”
This is the last step to enter BIOS in Windows 10. Once the BIOS or UEFI window opens, you can make the desired changes.
It is advisable to first read about all the options in BIOS before making changes because any mishandling with BIOS settings can hamper proper OS functioning.
BIOS update
BIOS updates generally don’t boost processing time or add any new feature to the operating system. On the contrary, it may expose the system to new bugs and interfere with the OS. One should only consider updating the BIOS if the OS is already experiencing bugs or the system requires additional hardware support.
Conclusion
BIOS is essential for the proper functioning of an operating system. Although default settings of BIOS work fine for a PC, however, certain changes can be made to its settings to enhance security.
In case you are looking for any Windows-based software for your business, you can check out SaaSworthy. Here we provide you with the best-suited software recommendations based on your business-specific requirements.