It is quite common to face technical challenges when you work with any software. These challenges can be quite frustrating, especially when they affect your work and productivity. Having access to the right troubleshooting guide can help the users to easily resolve common issues on their own and resume their work quickly.
In this blog, find out how to troubleshoot some of the common issues that users may face while using the video management platform Panopto. Whether you are facing issues with uploading videos to Panopto, viewing the videos, recording remotely, or using Panopto on Windows/Mac, you will find your answers in this blog.
Table of Contents
Troubleshooting Upload Issues in Panopto
1. Issue: Uploads are blocked
How to troubleshoot: Sometimes, users may face warnings, such as, ‘uploads are blocked,’ or they may see that the upload has stopped at some percentage, or the Resume Upload button does not resume the upload successfully. The uploads will usually fail if the UploadDaemon process is not running properly. Below are the steps to troubleshoot this issue:
- First, users must make sure that Panopto Recorder is installed in the Application folder.
- Next, they need to open the Activity Monitor and look for the UploadDaemon process. Once the process is found, the user should terminate and relaunch it.
- In case, you are unable to find the process, then perform the below steps:
- Find the “/var/Panopto” folder.
- The admin and panopto_upload accounts will have read/write access to this folder.
- The folder will contain an upload-daemon-wrapper file.
- There is also another file called “/Library/LaunchDaemons/com.panopto.uploaddaemon.plist.”
- Next, the user must put in the command sudo launchctl load -wF /Library/LaunchDaemons/com.panopto.uploaddaemon.plist.
- If the upload issues are still not resolved, then it is recommended that you re-install the Recorder.
2. Issue: How to use GetLogs
How to troubleshoot: If you wish to retrieve your system logs and basic system information quickly, then you can follow the below steps and find out how to use GetLogs:
- First, you need to download the GetLogs zip file using the appropriate link: Windows PC, 64-bit, Windows PC, 32-bit, and Mac.
- Once the zip file is downloaded, extract the GetLogs.zip to your desktop. You can do this by dragging and dropping the GetLogs.bat (Windows) or the Panopto Support (Mac) file.
- Follow the below steps for using GetLogs for Windows:
- Extract the downloaded GetLogs file which will create a new .bat file, GetLogs64.bit or GetLogs.bat.
- To run the tool, double-click on the .bat file.
- The logs and system information will be collected in the same location.
- Once all the files have been gathered, the command prompt window will close.
- If required, users can compress the collected files into a .zip file.
- Follow the below steps for using GetLogs for Mac:
- To run the tool, double-click on the Panopto Support file. If you are unable to open this file because it was downloaded from the Internet, right-click on the file or select Ctrl + click on the file to open it.
- All the logs and systems will be collected by the tool, and it will collect and place the information in a .zip file on your desktop. If this does not work, then you will need to contact Panopto’s Support team.
- After the logs have been collected, you can close the tool by clicking on the Quit button.
- Finally, once you have your .zip file with the logs ready, you can send it to Panopto Support for review.
Troubleshooting Common Issues in Panopto for Windows
1. Issue: Could Not Process
How to troubleshoot: Users may the error message ‘Slides not processed.’ This usually occurs because the PowerPoint file is using custom fonts. Since the custom fonts are not on the servers, the slides will not be processed, resulting in the error message. Below are the steps to resolve this issue:
- Open the PowerPoint file. On the Home tab, navigate to the Editing section, select the Replace dropdown menu, and click on Replace Fonts.

- Replace the custom font by choosing a TrueType font, such as Times New Roman, and click on Replace.

- Save the file with the replaced fonts and refilm your session.
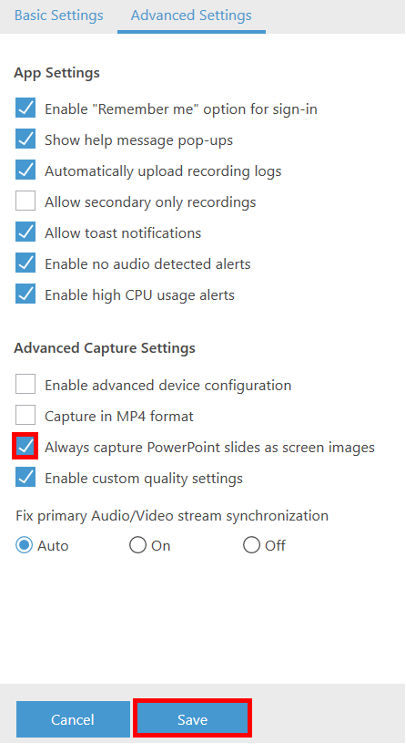
- The second solution that you can try is to capture the slides as screen images. For this, you will need to reshoot your session but before you start recording, go to the Settings tab of the application, and select Advanced Settings.

- Under the Advanced Capture Settings option, select the checkbox next to Always Capture PowerPoint slides as screen images and then click on Save.
- The third solution is to reshoot your session but instead of replacing the fonts, the slides should be captured using Panopto Capture.
2. Issue: Fonts are changing in PowerPoint after the video is uploaded
How to troubleshoot: It is common for users to see that their custom fonts within the PowerPoint presentation have changed in the Viewer after the video has been processed or uploaded. The fonts could show up larger or smaller than expected, misplaced, etc., due to the change. Below are the steps to fix this issue:
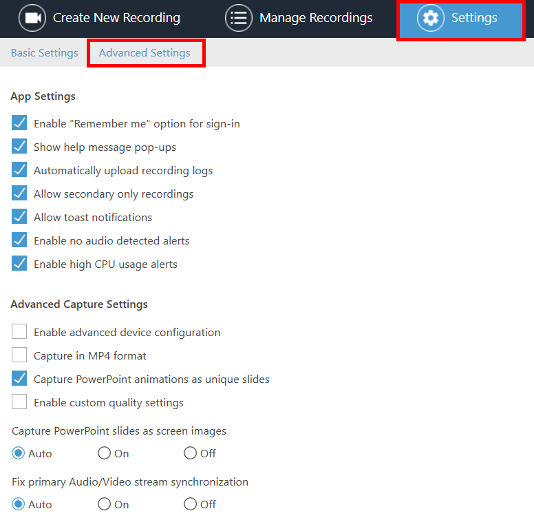
- The best workaround is to process the slides as images. If your presentation has several animations, annotations, custom fonts, or macros, then it is recommended that you choose the setting Capture PowerPoint slides as screen images in your Panopto application.
- To do this, select the Settings option in the Panopto application, and click on Advanced Settings.
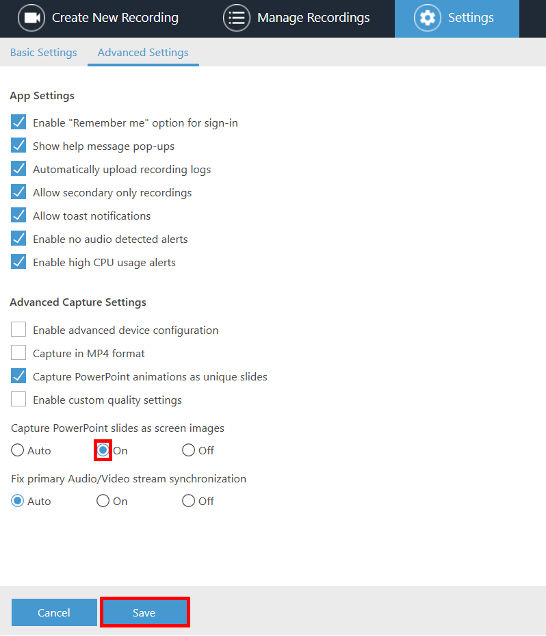
- Below the Capture PowerPoint slides as screen images option, select On, then Auto, and click on Save.
Troubleshooting Common Issues in Panopto for Mac
1. Issue: Identifying which version of Panopto for Mac is installed on your Mac
How to troubleshoot: For Panopto to run successfully on your Mac machines, it is important that you install the updated and latest version of Panopto for Mac on your system. Below are the steps to identify which version of Panopto for Mac is installed in your system:
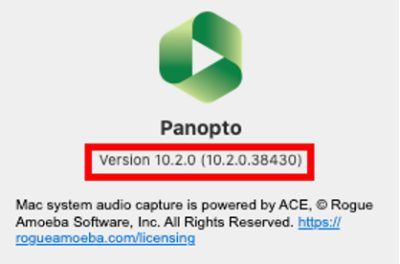
- Open the Panopto application, select the option Panopto, and then click on About Panopto.
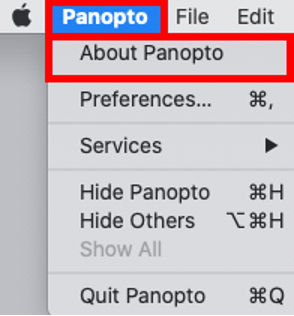
- A new window will appear where the Version number will be listed under the heading Panopto. For example, in the below screenshot, you can see that Version 10.2.0 is installed.
2. Issue: Screen not being recorded on Mac when using Capture
How to troubleshoot: Users may notice that their PowerPoint presentations are not appearing when they are using Panopto Capture. This is primarily because you need to provide additional permissions to allow the screen to be captured by your desired browser. If these permissions are not provided, then the screen will not be recorded. Below are the steps to fix this issue:
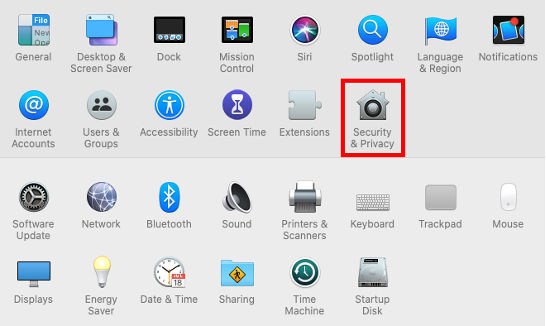
- Open your System Preferences either by selecting the System Preferences icon on the dock or by clicking on the Apple menu icon in the upper left-hand corner and selecting System Preferences.

- Once the System Preferences menu is an option, click on Security & Privacy.
- In the Security & Privacy menu, you will find the option Screen Recording on the left-hand side menu. You will see a list of browsers and you can select the checkbox next to your desired browser, allowing it to capture a screen or application.
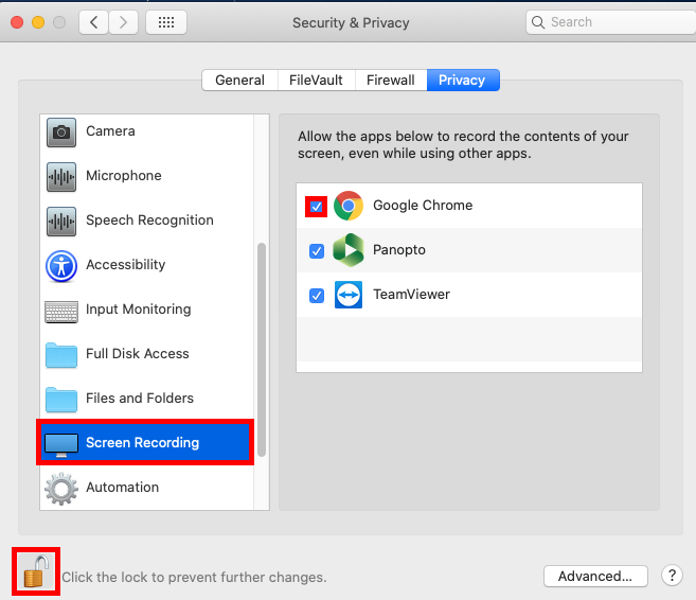
- There is a lock icon at the bottom left corner. Make sure this is in the unlocked position so that you can make the desired changes.
Also read: A Step-by-Step Guide to Using Oxylabs’ New Feature
Troubleshooting Common Issues in Panopto for Remote Recordings
1. Issue: Resolution of issues with Datapath Vision AV and LC Cards
How to troubleshoot: There are several high-quality capture card options provided by Datapath that can be used with the Panopto Remote Recorder. However, there can be issues, especially resolution issues when users are configuring it for the first time. Below are two solutions to troubleshoot this issue:
- The first solution is to toggle inputs or devices. If the resolution issue occurs occasionally and you do not have too much time to resolve it, then the admin can perform either of the options below to reset the card:
- Toggle the recording on or off; or
- Go to the Remote Recorder settings, switch the primary and secondary sources, and then switch them back.
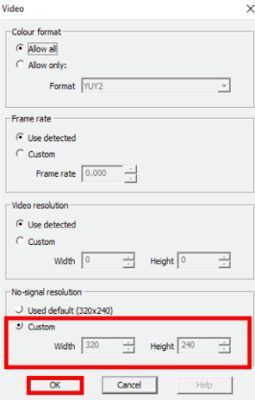
- The second solution is to adjust the settings in Vision Configure. You will need to first install Datapath’s configuration utility as per the manufacturer’s instructions. Then open the Vision Configure software as an admin and under the Input Properties option, select Video.
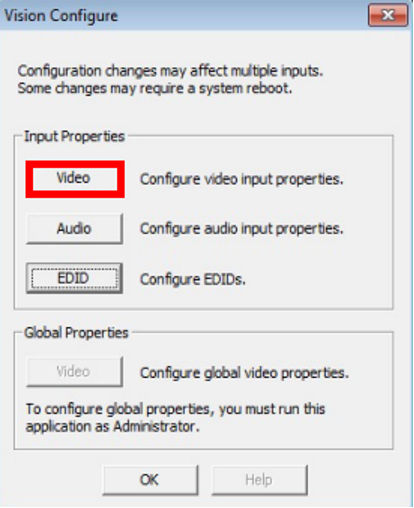
- The Video window will open, and you will find a section called No-signal resolution. Select the Custom option and enter your desired resolution when no signal is detected. Once done, click on OK.
- If the resolution issue persists, then you will need to contact the Panopto Support team for further assistance.
Troubleshooting Common Issues in Panopto for Viewing
1. Issue: Errors or issues that may occur while viewing Panopto videos
How to troubleshoot: There may be various issues or errors that users may encounter while watching Panopto videos. Below are some of the common issues and ways to resolve them:
- Buffering
-
- Buffering issues may arise due to bandwidth requirements. Users can learn more about the viewing requirements here, and then perform a speed test to ensure that the download speed is greater than the requirements.
- Quality is another common issue related to buffering. To check the quality, select the option Quality from the bottom right-hand corner of your Panopto video. Then select the Automatic option and check if it resolves the issue. If not, you can try setting the quality to High.

-
- In some cases, you may have to troubleshoot the browser. You will need to check if the browser is up to date, or you can try using a different browser to see if the buffering issue is still occurring.
- Sometimes, you may also have to troubleshoot the computer/network. You can try using a different computer or network to see if the buffering issue still occurs.
- Another option is to troubleshoot the Variable Speed Playback (VSP). You will need to perform a check to see if the video is buffering or stopping when playing at all speeds. To do so, click on Speed in the bottom right-hand corner of your Panopto video and then select each speed listed on the Play speed menu.

- Video Does Not Play
-
- If your video does not play, then you may have to Request Access. You can try accessing the video through your LMS or SSO page. If this does not work, you can contact the content owner or local help desk.
- You may see the error message ‘This Session isn’t available. It may have been deleted.’ In this case, you will need to contact the content owner or local help desk.
- Sometimes, users may get the error message ‘Unexpected error page.’ In this case, you will need to contact the content owner or local help desk.
- Can’t Maximize Stream
-
- If you are unable to view any stream, or full screen in Chrome then it may be because hardware acceleration is being enabled in one of the three places in Chrome’s environment. You can try disabling the hardware acceleration in each location, and test whether each setting change has resolved the issue or not.
- Open Chrome, navigate to Settings, and click on Advanced Settings. Next, select System and deselect Use hardware acceleration when available.
- In the Panopto interactive viewer window, right-click one of the stream windows to the contextual menu for the Flash player. Select Settings and deselect Enable hardware acceleration under the Display tab.
- Type chrome://flags into the browser. Locate Hardware-accelerated video decode Mac, Windows, and Chrome OS and disable the feature.
2. Issue: Resetting Panopto Password
How to troubleshoot: Below are the steps on how users can reset their Panopto password:
- The first step is to request a Password Reset. To do this, go to the Panopto log-in page and select Forgot your password? option.
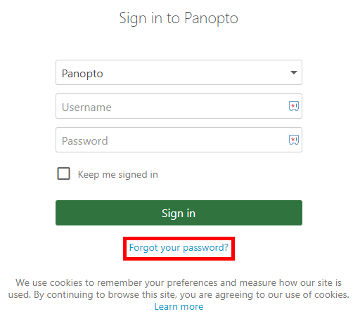
- Enter your username and click on Continue.
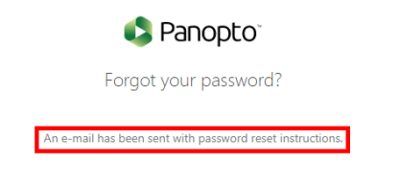
- The below window will show up indicating that an email has been sent with password reset instructions.
- If you are an enterprise customer and have forgotten the answer to your security question, please contact your organization’s point of contact with a password reset request.
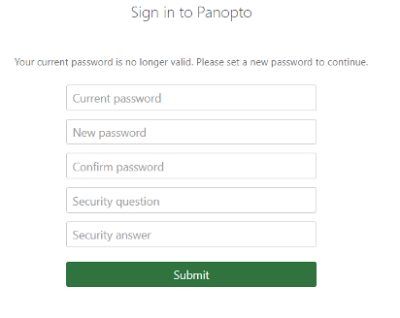
- Copy the temporary password provided in the email and click on the Sign in button. In the new page that opens, enter your username and the temporary password to Sign in.
- Next, a new window will open prompting you to change your password. In the Current password textbox, put in the temporary password, Then, type in a new password in the New password and Confirm password text boxes, set a Security question and Security answer, and finally click on Submit.
Troubleshooting Common Issues in Panopto for User Management
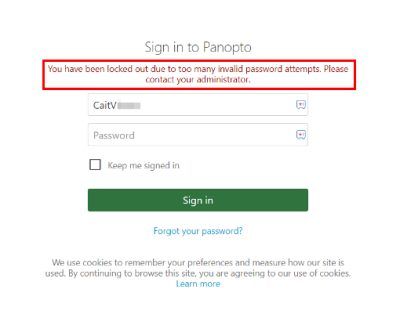
1. Issue: Unlocking a User Account
How to troubleshoot: Panopto will lock a user out of their account after 20 failed log-in attempts. Below are the steps that an Admin should follow to unlock the user’s account:
- When the user is locked out of their account, they will see the below error message:
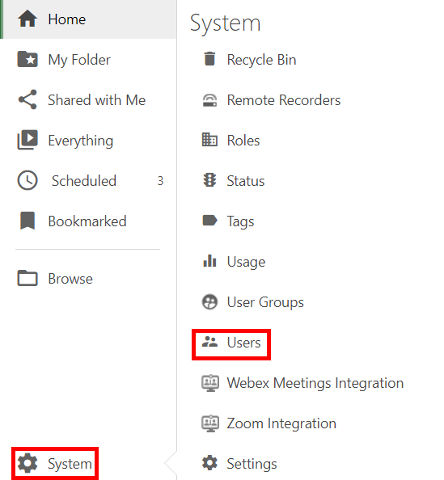
- The admin should log in to Panopto, expand the System menu, and select Users.
- Find the user and select the Info button.
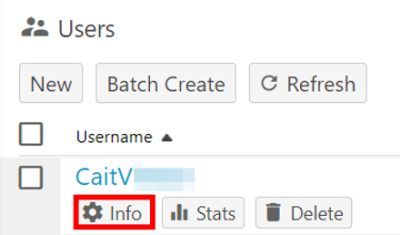
- On the Info page, scroll down to the section Account Locked and click on Unlock Account.

- Once done, the Account Locked section will disappear, and the user will be able to access their account successfully.
These are some of the common issues that users may face while using Panopto. We hope this blog helps you to resolve these common issues on your own and have a seamless experience while using Panopto. If you wish to explore more resources offered by Panopto, we recommend you check out the below links: